Managing User Custom Fields
User Custom Fields in KACE Cloud allow you to store additional user data beyond the built-in fields and map that data to LDAP or SCIM attributes. When mapped, these fields are automatically populated during user synchronization. This feature is useful for capturing organization-specific details—such as Manager, Department, or Mobile number—that are not part of the default schema. After creating custom fields, you can configure SCIM attribute mappings to ensure accurate synchronization of user data from external identity providers like Azure AD or Okta.
Creating User Custom Fields
To create a Custom User Field:
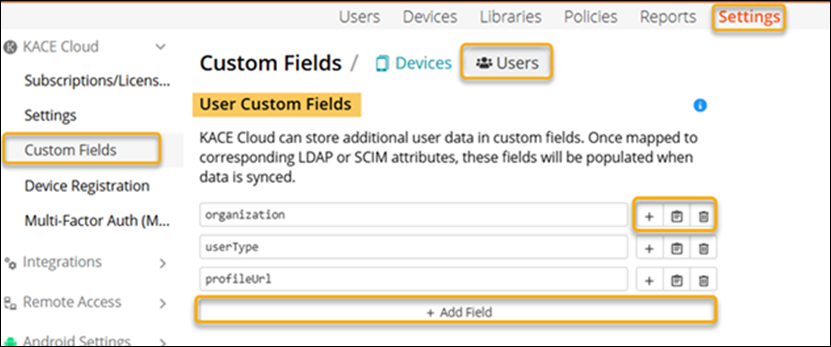
- Go to Settings in top navigation.
- In left navigation, select KACE Cloud > Settings > Custom Fields > Users.
- Select the Users tab.
- Under User Custom Fields, click + Add Field.
- Enter the name of the custom field.
Examples: - organization
- userType
- profileUrl
- To add more fields, repeat step 4.
- Click Save.
These fields will now appear in the user profile and can be mapped to SCIM attributes during provisioning.
Add a Custom SCIM Attribute
- Go to Settings in top navigation.
- In left navigation, select KACE Cloud > Settings > Custom Fields > Users.
- Select the Users tab.
- Under SCIM User Attributes, click + Add Attribute.
- Enter the full attribute name using the correct namespace format.
For more details on rules for creating a custom SCIM attribute, see Rules for Creating Custom SCIM Attributes. - Click Save.
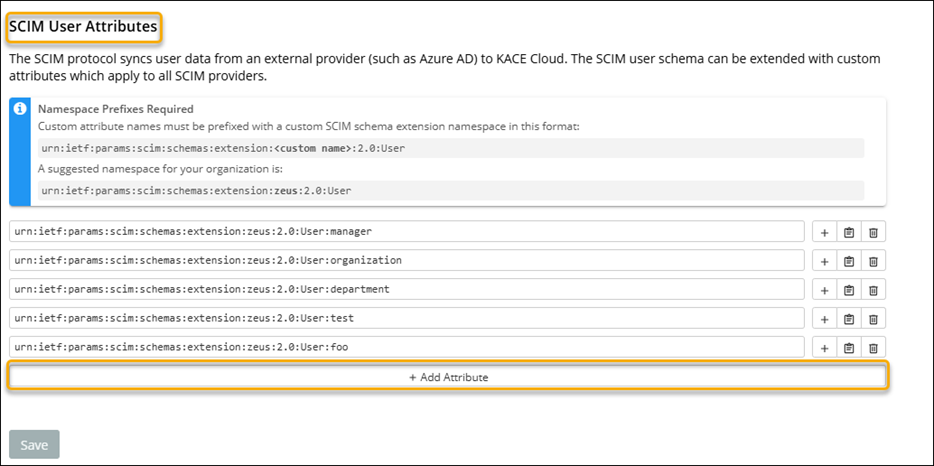
Defining SCIM User Attributes
The SCIM protocol syncs user data from an external provider (such as Azure AD) to KACE Cloud. The SCIM user schema can be extended with custom attributes which apply to all SCIM providers.
Rules for Creating Custom SCIM Attributes
You must follow these rules for creating a custom SCIM user schema attribute:- There are two parts to specifying a custom SCIM user attribute:
- The first part is the name of the custom SCIM extension the admin wants to use, such as urn:ietf:params:scim:schemas:extension:CustomExtensionName:2.0:User.
- The second part is the name of the custom attribute the admin wants to create, such as sAMAccountName.
- When creating the new custom attribute, the name of the attribute that you provide must be specified using the custom extension name followed by a colon ':' and then the custom attribute name. For example:
urn:ietf:params:scim:schemas:extension:CustomExtensionName:2.0:User:sAMAccountName
Where:
urn:ietf:params:scim:schemas:extension:CustomExtensionName:2.0:User is the custom namespace.
sAMAccountName is the attribute name.

NOTE: The same custom extension name portion of the attribute name can be used as part of any/all of their custom SCIM user schema attributes, if required.
- The namespace must start with urn:ietf:params:scim:schemas:extension:, but cannot start with the standard SCIM user schema namespace which is urn:ietf:params:scim:schemas:extension:enterprise:2.0:User.
- A suggested SCIM user namespace to use is urn:ietf:params:scim:schemas:extension:CustomExtensionName:2.0:User, since it indicates that this is a custom user extension and does not conflict with urn:ietf:params:scim:schemas:extension:enterprise:2.0:User.